Glitter can stay on the lid instead of falling onto the cheeks with the right steps. Choose a creamy or adhesive formula, apply a tacky base, and press glitter on gently rather than sweeping. Prep and prime the lids to give sparkle something to hold onto. A few quick fixes after application will help the look last longer and stay neat.
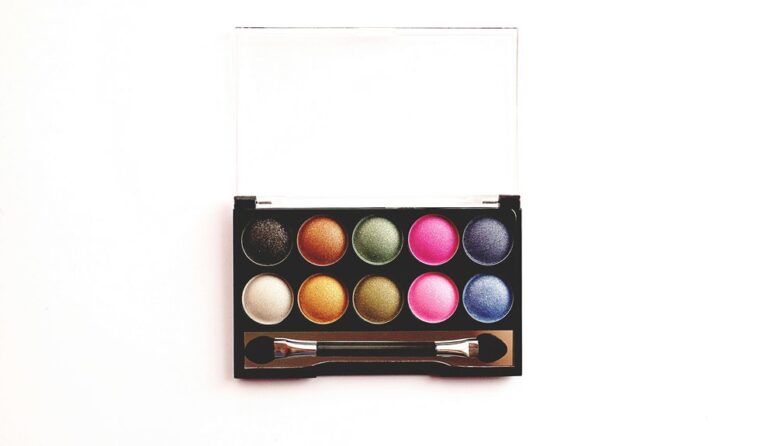
Choose the Right Glitter Formula
When you choose the right glitter formula, you make the whole look easier, cleaner, and a lot less stressful.
You fit in faster when your sparkle stays where you place it. Start with refined loose glitter, because it gives you better glitter finish quality and less mess. Next, check particle size selection carefully. Smaller particles blend smoother, while chunky bits can scatter and cling where you don’t want them. If you want more control, mix the glitter with a tacky glue made for eyes. That helps the color stay bright and bonded. Also, pick products labeled for low fallout, since they work better on folded lids and keep your look polished. When your formula matches your goal, you can enjoy the shine without feeling like you’re fighting it.
Prep Your Eyelids for Glitter
Before you add glitter, give your lids a clean, smooth base so the sparkle has something solid to hold onto. Start with gentle cleansing, then pat on a thin layer of primer. This step matters because eyelid priming helps glitter stay put and keeps creases from taking over your look. For hooded lid prep, focus on the area where your lid naturally folds, then let the product set for a minute.
- Wipe away oil.
- Apply primer evenly.
- Let it dry.
- Check the crease.
If your skin feels dry, use only a tiny amount of moisturizer earliest. You’re building a shared little stage for the glitter, and that prep makes you feel ready, polished, and right at home.
Use the Right Tools for Clean Application
A clean glitter look starts with the right tools, because the brush you choose can make sparkle feel smooth instead of messy.
You’ll do better with a small synthetic shader, and moda metallics brush tips help you place glitter right where you want it. Their firm shape gives you control, so you’re not chasing flakes around your cheeks like they’ve got plans of their own.
Before you dip in, try setting spray brush prep. A light mist helps the brush grab shimmer, then you can tap off extra product and press it onto the lid.
Next, keep a clean fluffy brush nearby to sweep away stray sparkle fast.
As your tools work with you, you feel calmer, more polished, and ready to shine with the group.
Apply Glitter Over Primer
Primer gives your glitter a much better chance to stay put, so you should start there and then press the sparkle on top. That base helps you feel ready, not rushed, and it keeps your look neat when you wear glitter over concealer. Before you begin, check primer compatibility tips so your formula matches your glitter and lid finish.
- Smooth a thin layer across the lid.
- Let it set until tacky, not wet.
- Tap glitter on with a flat brush.
- Build in small layers for even shine.
You’ll get cleaner color, less mess, and a more polished finish. When the primer feels comfy on your skin, you’re in a good spot. Then you can join the sparkle crowd with confidence and enjoy every bright blink.
Add a Sticky Base for Better Hold
Whenever you want glitter that truly stays put, a sticky base is your best friend. You can reach for tacky primers or other adhesive formulas that stay slightly wet, because that grip helps the sparkle cling where you place it.
Tap a thin layer onto your lid, then wait a few seconds until it feels grabby, not slippery. That little pause matters, since it gives your glitter something to catch and keeps you from chasing fallout later.
Whenever your lids crease or move a lot, choose a base made for long wear so you feel covered and confident. With the right sticky layer, you’re not fighting your makeup. You’re building a look that feels polished, secure, and very much yours.
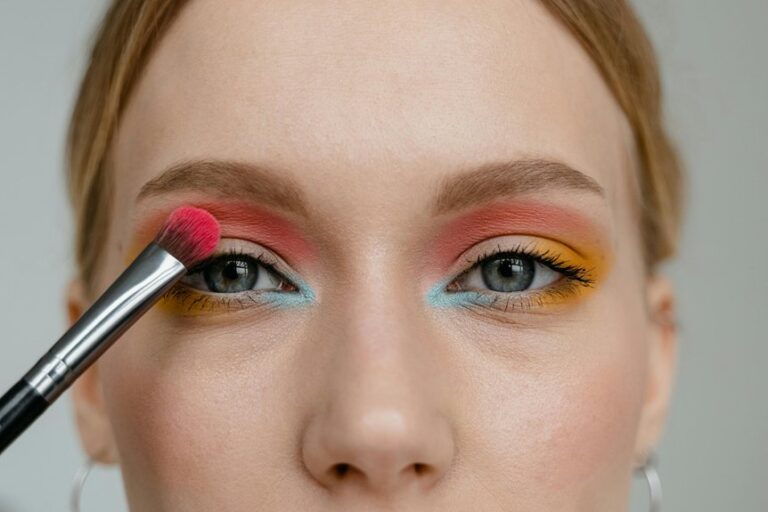
Press Glitter On in Thin Layers
Press the glitter onto your lid in thin layers so you stay in control and keep fallout low.
You’ll get richer color through building it slowly, and each soft pat helps the sparkle stick where you want it.
Should the initial layer looks light, that’s okay, because a few gentle presses usually give you the bright finish you want without the mess.
Thin Layer Application
whenever you want glitter that looks smooth instead of messy, thin layers are your best friend. You stay in control, and your sparkle control improves fast. This keeps glitter placement neat and gives you a polished look that feels made for you.
- Pick up a little glitter on your brush.
- Press it onto the lid, not swipe.
- Add another light layer only where you want more shine.
- Check both eyes so the finish feels even.
Whenever you work this way, you keep the look soft and clean. It also helps you avoid that packed-on, party-confetti effect nobody asked for. Whenever a spot looks too strong, tap it gently with a clean brush and keep going.
Build Color Gradually
As you build glitter color gradually, you give yourself more control and a smoother finish. Press the glitter on with a flat brush or fingertip, then stop before it looks full. That slow pace creates gradual intensity, so you can stay in charge of the shine and keep your look polished.
Add one thin layer, then another, and let each pass catch the light. This method helps you build dimension without making the lid feel heavy or crowded. Should you want a softer glow, use lighter pressure and fewer taps.
When you want more sparkle, repeat the same gentle press in small spots. You’ll fit right in with that clean, confident finish, and your glitter will look intentional, not overdone.
Minimize Loose Fallout
Now that you’ve built the color the smart way, the next job is to keep that sparkle on the lid, not on your cheeks. You can do that with fallout prevention and tight product control.
Press glitter on in thin layers, and let each layer settle before you add more. That keeps you in charge and helps the finish stay neat.
- Load a tiny amount on your brush or fingertip.
- Tap off the extra so you don’t dump glitter everywhere.
- Pat it onto the lid instead of dragging it.
- Build slowly until you get the shine you want.
If you work this way, you’ll fit right in with the people who keep glitter polished, not messy. And yes, your under-eyes will thank you too.
Clean Up Fallout as You Go
When glitter starts drifting where you don’t want it, you don’t have to panic or start over. Keep a quick cleanup routine close to with a clean fan brush, a bit of tape, and cotton swabs. Gently lift stray sparkle from your cheeks and under eyes before it settles into your base.
If you see a few flecks in your under eye touch ups, tap them away with a soft sponge, not a swipe. That keeps you in control and helps you stay in the glam zone with everyone else. Work in small moves, then check both eyes in good light. You’re not fixing a mistake, you’re just keeping your look polished and party ready.
Blend the Edges Without Smudging
To soften the glitter edge without smearing the sparkle, use a clean, small brush and tiny tapping motions instead of dragging the product across your lid. That gentle touch keeps your look polished and helps you feel right at home in your shine. For better edge softening, work slowly along the border where glitter meets skin. Then, use these steps:
- Tap the brush along the outer line.
- Keep pressure light and steady.
- Blend a little at a time.
- Check the crease changeover in soft light.
If one spot looks sharp, add a few more taps, not swipes. You’ll keep the sparkle intact while making the edge melt in naturally. That way, your glitter looks smooth, balanced, and easy to wear with confidence.
Set Glitter for Long Wear
To keep your glitter in place, you’ll want a strong adhesive that grips without feeling heavy.
Then, apply the glitter in thin layers over your base so it sets evenly instead of slipping around.
Finish with a setting spray to lock everything down and help your sparkle last through the day.
Choose Strong Adhesive
A strong adhesive can make the difference between glitter that stays put and glitter that seems to wander off your lids like it has places to be. Your strong adhesive choice should match your skin and your plan for the day. Look for formulas made for eyes, and follow adhesive safety tips so you don’t irritate delicate skin.
- Pick a lash glue or glitter glue that dries tacky.
- Check the label for eye-safe use.
- Try a tiny amount on your wrist beforehand.
- Use a clean tool, then press the glitter where you want it.
When you choose well, you feel ready, not worried. That calm helps you enjoy the sparkle and keeps your look in the group-chat worthy zone.
Layer Lightly Over Base
Once your glitter is in place, layering it lightly over a base helps it last longer and look smoother.
You’ll get the best finish once you press a soft base shimmer onto the lid firstly, then add your glitter in thin, even passes.
This gives the sparkle something to grip, so it stays put and feels less scratchy.
Next, build a sheer sparkle veil by tapping on a little at a time instead of piling it on.
That gentle method keeps the color clean and makes your eyes look polished, not crowded.
Although you want a friendlier, more seamless glow, keep your hand light and stay patient.
You’re not rushing a stage look here, just giving your sparkle a comfy seat.
Lock With Setting Spray
Whenever your glitter is finally in place, a good setting spray helps it stay bright and put, not drifting down your cheeks until lunchtime. You’re not just finishing makeup, you’re giving your look a setting spray seal that feels like a long wear lock for the whole day. Hold the bottle back, mist evenly, and let it dry so your sparkle can stay with the group, not slide off prematurely.
- Close your eyes initially.
- Spray in a light X and T pattern.
- Let it air-dry fully.
- Add a second mist should you need extra hold.
That last step matters whenever you want your glitter to look polished, confident, and ready for every selfie. A quick seal keeps your shine where it belongs.
Fix Common Glitter Makeup Mistakes
If your glitter eye makeup looked stunning in the mirror but started drifting, creasing, or sticking to your cheeks, don’t worry, because most glitter mistakes are easy to fix.
Initially, check for glitter removal errors from brushing too hard or wiping in circles, since that can spread sparkle instead of lifting it. Next, use a clean fan brush to sweep away loose bits, then tap on a little more primer where the shine slipped. When you have hooded eye fallout, keep glitter below the crease and pat it on in thin layers. Also, stop adding too much at once, because heavy glitter likes to travel. Finally, smooth the edges with a tiny shader brush, and you’ll look polished, not messy, with your crew.
Remove Glitter Safely
Now that you know how to fix glitter makeup mistakes, it’s just as essential to remove glitter the right way so your skin stays calm and your eyes stay happy. For safe glitter removal, soak a cotton pad with micellar water or oil cleanser and hold it on your lids for a few seconds. Then wipe softly, never scrub. Use this gentle eye cleanup so you don’t irritate lashes or scratch the skin you love showing off with your glam crew.
- Press, don’t rub.
- Sweep downward with clean pads.
- Rinse with lukewarm water.
- Finish with a mild eye cream.
If glitter lingers, use tape lightly on dry skin. You’ll feel fresh, comfy, and ready for your next sparkle moment.