Makeup lasts longer and looks smoother when products are layered in the right order. Start with clean, moisturized skin and SPF, then apply a thin primer so makeup grips better. Use color corrector only where needed, follow with a light foundation, and tap on concealer for targeted coverage. Finish with powder, bronzer, blush, brows, eyes, and a setting mist for a polished, long-wearing result.
Prep Skin for Makeup
Before you reach for foundation or concealer, start with clean, well-treated skin, because that’s what helps makeup sit smoothly and last longer. Wash your face with a gentle skin cleansing routine to clear away oil, dirt, and yesterday’s makeup.
Then apply a serum when your skin feels dry, since hydration helps your base look fresh, not patchy. Next, use a light moisturizer and follow moisturizer timing tips while waiting 30 to 60 seconds so it can sink in.
Should it be daytime, finish with SPF moisturizer for protection. By prepping this way, you give your makeup a calm, even surface. That means you can step into the day feeling polished, comfortable, and ready to blend in with any crowd.
Apply Primer for a Smooth Base
Once your skin feels clean and hydrated, primer steps in to smooth the surface and help your makeup last longer. You want a thin layer, not a heavy mask, so your base stays fresh and comfortable. Primer benefits include softer texture, better grip, and less slipping through the day.
In case your skin leans oily, matte primer can help control shine. In case you want a glowing look, dewy primer adds a soft finish. With so many primer types, you can pick one that fits your skin and style.
Just tap it on with clean fingers and let it settle for a moment. Then your foundation glides on easier, and you feel more put together, like you’re already in the room with confidence.
Use Color Corrector Where Needed
Color corrector can feel a little tricky at the start, but it’s really just a smart way to fix tone before foundation goes on. You don’t need to use it everywhere. Instead, place it only where discoloration needs help, like redness around the nose, blue under-eyes, or dark spots.
Then choose shades that support tone matching and undertone balance, so your base looks more natural and less flat. A peach tone can brighten shadows, while green can calm redness.
Use a small amount and blend softly with your fingertip or sponge. That way, you keep the area smooth and avoid heavy buildup. Whenever you target just the spots that need it, your makeup feels more like you, only more even and comfortable.
Apply Foundation in Thin Layers
A thin layer of foundation usually works best because it gives you control from the start. You can tap a little onto the center of your face and spread it outward, so your skin still looks like you. With thin foundation layering, you join the crowd without hiding your features. Should you need more, use buildable coverage techniques and add a second light pass only where you want it.
| Step | Feeling |
|---|---|
| Initial layer | Calm |
| Blend gently | Safe |
| Add more if needed | Confident |
| Stop before it looks heavy | Like yourself |
This soft approach helps you fit in with ease and keeps your base smooth. Use a damp sponge or brush, then check the mirror in natural light.
Conceal Dark Circles and Blemishes
After your foundation sets, use color corrector first if dark circles look blue, purple, or green, because it helps cancel the shadow before you add concealer.
Then tap concealer only where you need it, like under the eyes or right on a blemish, so you keep the coverage clean and natural.
When you blend in small touches and build slowly, your skin looks smoother without that heavy, cakey finish we all try to avoid.
Color Correcting First
Whenever you want your makeup to look smooth and last longer, start with color correcting before foundation and concealer.
You’re not covering up; you’re helping your skin look like it belongs in the same family as the rest of your makeup. Use shade correction to calm redness and brighten shadowed areas, so your tone balance feels natural. Then foundation can glide on without fighting uneven color.
- Green helps soft red spots feel less loud.
- Peach brings warmth back under tired eyes.
- Lavender softens dullness and enhances life.
- Yellow can steady mild discoloration fast.
With a light touch, you keep the base fresh and believable. That makes your whole look feel easier, and honestly, more like you on a good day.
Spot Concealing Techniques
Spot concealing works best when you treat each mark like its own tiny project, because dark circles and blemishes need different kinds of coverage.
After foundation, tap a creamy concealer under your eyes in a thin triangle, then blend toward the cheek for a lifted look.
For spots, use spot conceal tactics with a tiny brush or fingertip and press product only where you need it. Let each layer sit for a few seconds, then tap again whenever the color still shows.
For stubborn redness, try blemish masking methods with a shade that matches your skin exactly. Keep the edges soft so your face still looks like you, not a mask.
With a little patience, you’ll look polished and feel right at home in your skin.
Set Your Base With Powder
You can set your base with powder before foundation whenever you want your makeup to stay put and feel less slippery.
A light dusting helps control shine, so your foundation can grip better and wear more evenly.
Whenever you’re oily in the T-zone or just want extra hold, this step can make the rest of your makeup last through the day.
Powder Before Foundation
A light layer of powder before foundation can be a game changer, especially whenever your skin gets shiny fast or your makeup tends to slide through midday. You’re not doing makeup layering wrong; you’re just giving your base a steadier start with setting powder.
- You tap it on where oil shows up initially.
- You feel less worried about streaks.
- Your foundation glides on with more control.
- You join the crowd that looks fresh longer.
Use a small brush and keep the layer thin. Then press foundation over it, not too hard. This helps you build coverage without that slippery feeling.
If you’ve ever wanted your makeup to stay calm with you, this step can help you feel covered, confident, and right at home in your look.
Lock In Makeup
Locking in your makeup starts with powder, and that little veil of product can make your whole base feel more stable and polished. You’re not hiding skin; you’re helping it stay put for long wear and easier makeup locking. After foundation and concealer, press powder where shine shows initially.
| Area | Powder Type | Why |
|---|---|---|
| T-zone | Loose | Cuts oil |
| Under-eyes | Fine | Softens lines |
| Cheeks | Pressed | Keeps color even |
| Chin | Light dusting | Controls slip |
| All over | Setting | Helps wear last |
Then sweep lightly across the rest of your face, so you look fresh, not cakey. Should you belong to the powder club, you know a small touch can save your whole look.
Add Bronzer, Blush, and Highlighter
After your base is set, bronzer, blush, and highlighter bring the face to life with color, warmth, and glow. Start with bronzer placement along the forehead, cheeks, and jaw to add soft depth, then sweep blush on the apples for a healthy, friendly flush. Next, use cheek highlighting on the high points, so your skin catches light in all the right places.
- Bronzer helps you look sun-kissed, not flat.
- Blush adds that “I’m with you” warmth.
- Highlighter lifts your features with a fresh glow.
- Blending them together keeps your look polished and welcoming.
When you place each product with care, you don’t just wear makeup, you feel like you belong in your own skin.
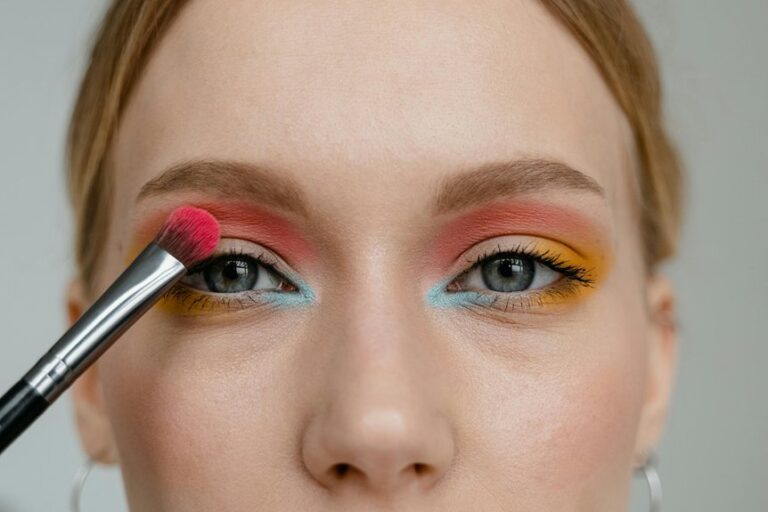
Fill in Brows Before Eye Makeup
Start with filling in your brows so you can see the shape of your face before you add eye shadow.
This step gives you a clean frame for the rest of your eye look, and it also helps you keep both brows balanced without guessing later.
If you tidy any stray product now, cleanup stays easier and your eye makeup won’t get messy.
Brow Shape Guide
Because brows frame your whole face, filling them in before eye makeup gives you a cleaner, calmer place to build the rest of your look. Once you start here, you can shape your brow arch with confidence and keep your features feeling balanced. Use brow mapping to find where your brow should begin, peak, and end, then follow that guide with light strokes.
- You feel more put together fast.
- Your eyeshadow looks less risky.
- You join the polished, everyday crowd.
- You trust your face to work with you.
Next, fill gaps with a soft hand and match both sides without chasing perfection. A slightly fuller brow can make you feel steady, like your look already belongs. Then move on.
Frame Before Shadows
With your brows mapped and filled, your eyeshadow has a cleaner space to shine, and that alone can make the whole face feel calmer. You set the tone for eyeshadow framing before you touch color, so shadow placement feels guided, not random. This step helps you match both brows and lids, which gives you a more pulled-together look.
| Step | What you do | Why it helps |
|---|---|---|
| 1 | Fill sparse spots | Builds shape |
| 2 | Soften edges | Keeps brows natural |
| 3 | Check balance | Supports symmetry |
| 4 | Apply shadow | Improves shadow placement |
| 5 | Blend gently | Keeps eye color tidy |
When your brows look steady, you feel more at ease, and that confidence shows. Then your eye makeup fits the frame you made, like a friend who knows the plan.
Smudge-Free Cleanup
When you fill in your brows before eye makeup, you give yourself a cleaner canvas and a lot less cleanup later. You can shape the rest of your look with less stress, and that feels good whenever you want to blend in with your beauty crew. Brow color also frames your eyes, so your shadow and liner stay in place more neatly.
- You dodge smears on finished shadow.
- You protect your under-eye area from fallout.
- You save time on makeup removal.
- You need fewer cleanup tools, which keeps your routine calm.
If a pencil slips, you fix it before your lids are done, not after. That small switch helps you feel polished, prepared, and part of the glow-up circle you want to join.
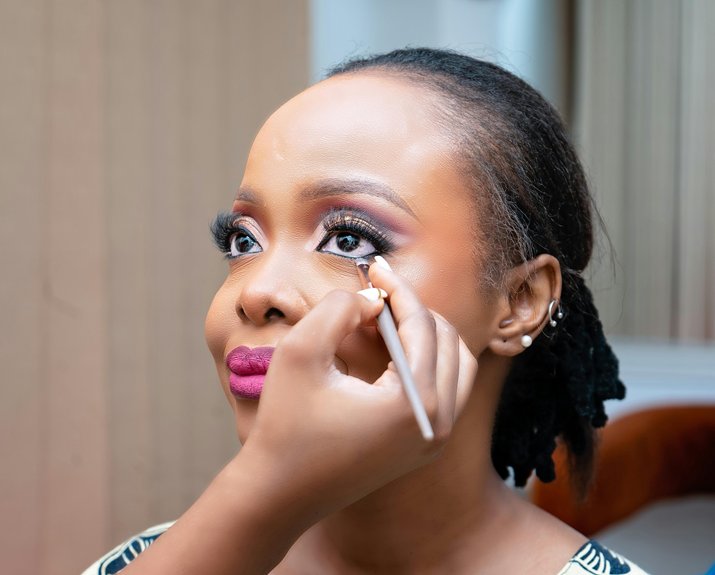
Apply Eyeshadow, Liner, and Mascara
Start your eye makeup after your base is set, and you’ll give yourself a much cleaner finish. Sweep on eyeshadow textures that suit your mood, from soft mattes to light shimmer, and blend them above the crease with a small brush. Then line close to the lash line, keeping the strokes short so you stay in control. Should you want a softer look, smudge the edge right away before it sets.
Next, use mascara techniques that lift each lash from root to tip. Wiggle the wand a little, then pull through for even coverage. Add a second coat only once the first feels tacky.
This order helps you build definition without tugging, and it keeps your eyes looking polished, open, and easy to wear.
Finish With Setting Spray
A final mist of setting spray can pull your whole look together, especially after you’ve layered powders, color, and detail. You give your makeup a softer finish, and you help it stay put through busy hours, hugs, and a little happy sweat.
Those setting spray benefits matter whenever you want to feel like you belong anywhere, from class to dinner.
- Hold the bottle at arm’s length and mist in an X.
- Let it dry on its own so your base stays smooth.
- Use a light second spray for extra comfort on long days.
- Keep it in your bag for quick touch-ups and confidence.
These long wear makeup tips help you protect the work you already did, so your look feels fresh, steady, and unmistakably yours.